I will show you how to make DIY fabric art!
So I really can’t tell you how much I love $30 Thursday! I look forward to it every month. Then I love the challenge of making something beautiful out of something that’s not so beautiful, which seems to be theme to my $30 Thursday Projects. I’m excited to announce that Jen, from Migonis Home, is joining Shayna and I in the $30 Thursday fun!
Now, let’s get to it! Here is my $30 Thursday Project….DIY Fabric Art!
I want to share with you how I went….

I hardly know where to start with this project. I found one of the framed prints at Goodwill. I snatched it up with plans to do something completely different with it. Then I spotted the exact same framed print at another Goodwill, what are the odds of that? The idea for this DIY Fabric Art project started to form, and when I found the gorgeous fabric (which I got a little too excited about in this post), it was on like Donkey Kong.
Let the tutorial begin!

1. These are the original framed prints from Goodwill, aka my “starting point”.
2. I began the careful process of disassembling the framed prints. I removed the paper backing, and carefully pulled out the staples that were keeping the prints in tact.
3. It was very important not to damage the matting (the picture shows the backside of the mat, the front was in great shape). I also wanted to keep the original cardboard square that backed the print, (this would be what I adhered the fabric to later). The actual original print was completely destroyed…which was fine by me!
4. I spray painted the (originally peachy colored) mats with several light coats of “Heirloom White” by Rust-Oleum.
5. I spray painted the frames with Krylon’s “Champagne Nouveau” (a nice silvery gold metallic).
6. I used the mat to determine the size of the fabric square I would need. I traced around the mat and cut out my fabric square.
7. I used Locite’s Spray Adhesive to adhere the fabric to the cardboard square that backed the original framed print. Once the adhesive dried, I trimmed off the excess fabric around the square.
8. Putting it all back together was a process in itself. I placed the glass back in the frame, placed the mat behind it, and placed the cardboard/fabric square. I used my staple gun and placed staples about 2 inches apart around the frame. Hold your staple gun about 1/2 inch away from the frame so that the staples don’t go all the way into the frame. You want them to stick out so that they keep everything together.
9. Hang your gorgeous DIY Fabric Art!

I am very pleased with the DIY Fabric Art!

They are hanging in our entryway, which can be seen from the living room. They go perfectly withe the new throw pillows! Gotta love that! 🙂
~
Now, meet the girls, if you don’t already know them, and check out their $30 Thursday Projects:

Click here to see how Jen made a bathroom shelf out of a floor joist!
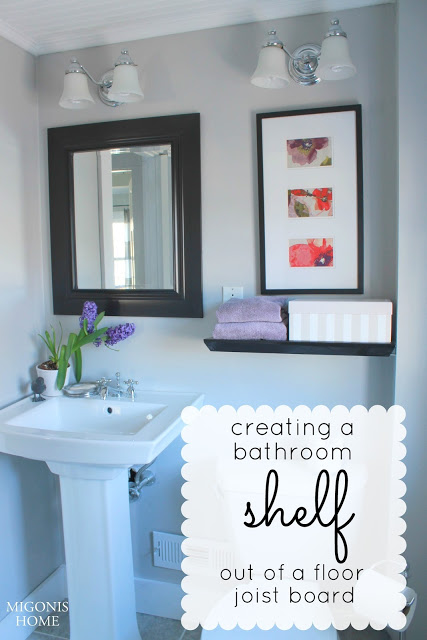
As a bonus, click here to see Jen’s recent bathroom remodel.
Here’s Shayna:
Click here to see Shayna’s super-cute DIY Spoon & Pallet Hook Rack.

I’m in the company of some serious talent, aren’t I?
Don’t forget to follow our $30 Thursday Pinterest Board!
Have a great day! 🙂
That fabric is perfect! Looks great!
Thanks, Jessica! I really, really love it! 🙂
Looks wonderful April! Love them! 🙂
-Shayna
http://www.TheWoodGrainCottage.com
Thanks, Shayna! 🙂
Love that fabric!! Love simple projects that make a big statement! Would love to have you share this at my party!
http://www.madetobeamomma.com/2013/04/homemade-by-you-45-brand-new-site.html
I’ll do it! Thanks, Katie!
Great idea, love the fabric choice too! Love that it matches your throw pillows.
Love this! So cute, the fabric is great! Also, I am loving the new photos in your header! If you haven’t already, would love it if you would link this up to Give Me The Goods Monday: 1 Party, 5 Blogs! http://www.rainonatinroof.com/2013/04/give-me-goods-monday-linky-party-2.html
Jenna @ Rain on a Tin Roof
Wow, those are amazing! {And seriously, what are the odds of finding the same print at two different Goodwills? Crazy!} No wonder you were so excited about the fabric– it’s gorgeous! I popped over from Give Me the Goods Monday–thanks for sharing!
~Abby =)
The fabric is awesome! I can’t believe you found it at Goodwill! Thanks for sharing at Give Me the Goods Monday! Hope to have you party with us again next week!
Chelsea @ Married Filing Jointly
very cute!
what a great idea! i LOVE how they turned out!!
I love the fabric too- and it adds such a nice pop over by the doorway, Nice job 🙂
Thanks for sharing with us, and it’s always great to see creative minds at
work. 🙂
Visiting from Overflowing With Creativity@ It’s Overflowing linky party
Smiles,
Suz @MaytagNMom
NW Illinois
~~My Current Project At The Party~~
Those frames look super happy in their new home and with their new look :o)
Gaby x
This is a fabulous update!! I love the idea of framing pretty fabric, pinning!
xo, Tanya
http://twelveoeight.blogspot.com/
I love how this $30 project turned out! Now I’m inspired to go get some beautiful fabric! Would you mind to share this at my blog hop? I think our readers would love to see this! Thank you 🙂
http://carriethishome.com/2013/04/frugal-crafty-home-blog-hop-18/
Wow! That is sooo awesome! I love this 😉
Jamie @ somuchbetterwithage.com
Love how the new prints match the pillows. Great job! Just beautiful. Love the color scheme too.
Do you know the maker of the fabric?
Do you know the maker of the fabric?
Do you know the maker of the fabric?
Hi there! I found you through Christy and the DIY link party. I’ve been having a hoot cruising through your blog. Happily following through BlogLovin!
-andi
Those original prints are old home interior (celebrating home) pictures.I have one in my kitchen and we have one at church in the ladies rest room 🙂 I would say they are from late 80’s early 90’s
I love this fabric as well! This past year I reupholstered a vintage motor home and used this very same fabric. I covered the seat backs of the bench seating with the floral print and covered the seat cushion with denim. It was adorable! Then we sold the motor home. I’m going to redo my office at some point and I just might use this print. Thanks for the inspiration and tutorial for the framed prints!
I found this exact wall art at GoodWill also. I chuckled because I had seen this post before I went there. I also found two of the same frames at 2 different Goodwill stores(different from the ones mentioned above). Thanks for the ideas. I love finding old things and making them new.
That is hilarious! It must have been a very popular print back in the day! 😉
Amazing looking DIY project.